Honda Motorcycle Homecoming Kumamoto 2025

Hello, RPV.

This time, it was held at the Kumamoto Works of Honda Motor Co.

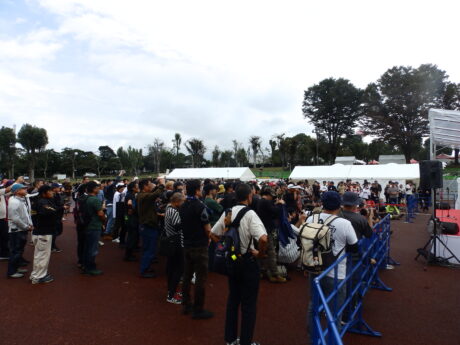
I went to an event called Motorcycle Homecoming.

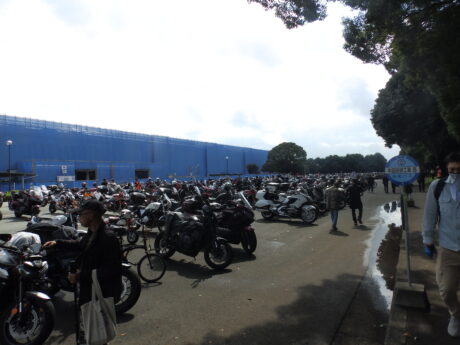
From early in the morning, many people from inside and outside of the prefecture came to the event.

Last year the event was cancelled due to bad weather.

It was pouring early in the morning, but we are glad that it managed to recover.

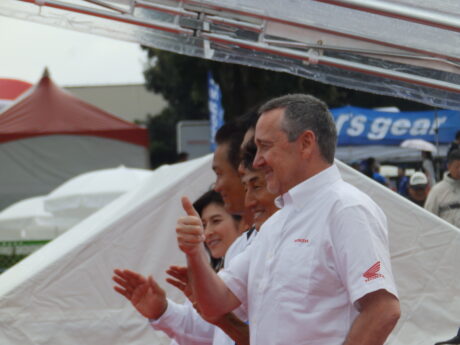
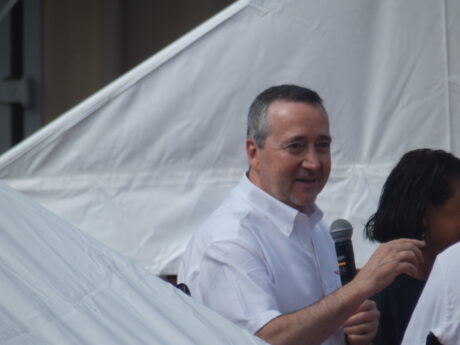
The highlight of the event will be the visit of Mr. Freddie Spencer!

I was not scheduled to participate in the opening, but I was rushed out of the opening.

He was also a participant in the event. The audience was very excited by his fan service.

Here's a thumbs up for the visitors' Spencer replica helmets.
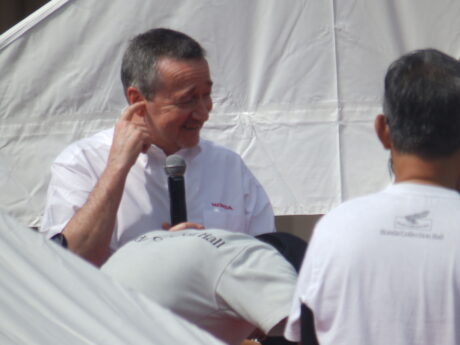
At the talk show

She had a mild-mannered atmosphere from her youth, but she rounded out and

It looks even gentler!


This is the expression on the face of the Daytona Racer engine startup with so much exhaust noise.

I guess I was used to hearing that when I was an active racer!

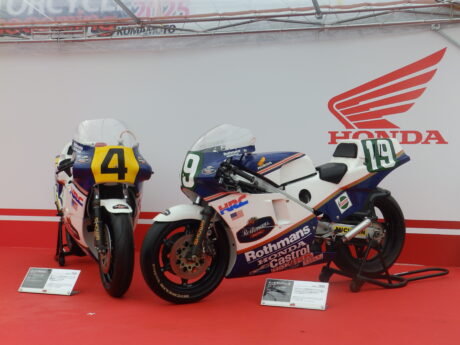
He was series champion in both the 500cc and 250cc classes of the WGP in 1985.

The photo below is the car he was driving at the time. The photo below is the car he was driving at that time.


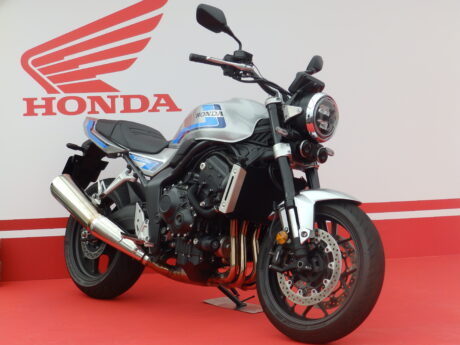
Then there is the new CB1000F model that is being talked about.

I am glad to hear that Mr. Freddie Spencer is doing well.

See you soon~!


early-morning attack

Hello, early Sunday morning, Green Road after a long time.

(Kenny Road).

It was still quite cold, but the early morning run felt good.

We are now entering the rainy season and so are motorcycle riders,

Whatever I do, it's a little depressing.

Take care of your health and get through the coming rainy season!

Observation of the internal structure of banjo fittings by X-ray CT

Hello, RPV.

In the midst of the Corona disaster, I have been too lazy to go far away from home and have been devoting my energies to the maintenance of my motorcycle.

I made a stainless steel mesh brake hose with banjo fittings. I can't find any manuals on how to make it, so I made it my own way, but the internal condition of the hoseI was curious about the inside of the body, so I decided to scan the inside of the body with an X-ray CT.

First, scan only aluminum fittings that are easily penetrated by X-rays.


The figure below is a CT scanned cross-sectional image. The internal structure can be clearly seen. There was a tightening allowance of approximately 6.5 turns of the nut.


It consists of three parts: banjo body, olive, and nut.

Trim the ends of the stainless steel mesh hose to be used.


Attach the olive to the hose. At this time, the stainless steel mesh should be installed as it is without cutting it short, especially when the end faces are aligned with the internal Teflon hose.


The key point at this point is to push the olive in just enough to contact the Teflon hose, as shown in the CT cross-sectional image below.


I inserted the hose into the banjo and tightened the nut about 5 turns.


The image below is a cross-sectional image. I thought the stainless steel mesh would surround the olive a bit more and go deeper into the banjo side, but not as much.


For your information, I used stainless steel banjo fittings (20°) for my vehicle. I covered the nut and hose with waterproof type heat-shrinkable tubing to prevent adverse effects of car wash and rainy weather (e.g., corrosion of olives).


For reference, here is a cross-sectional image. I think the stainless steel mesh is fastened in a nice way at the taper of the olive and nut. The stainless steel mesh tends to shorten laterally in the image below because it tapers open when incorporated. The Teflon hose is thin and hard to see in the image because the x-ray energy was increased to penetrate the stainless steel.

This time it was about the internal structure of the stainless steel mesh hose. It is nice to have a CT like this to see what the inside looks like without having to disassemble it!

See you later.

Notice of Participation in Exhibition (Nagoya)

Hello, RPV.

Wednesday, April 13 - Friday, April 15, 2012.
Exhibit at Nagoya Design & Manufacturing Solutions Expo

Place: Port Messe Nagoya

Hall Name : Exhibition Hall 1
Booth number : 10-31

If you are interested or have any questions, please do not hesitate to stop by.

The following is the schedule of our participation in the exhibition.

May
Location: Pacifico Yokohama
Period: Wednesday, May 25 - Friday, May 27
Automotive Engineering Exposition
 
June
Location: Tokyo Big Sight
Period: June 22 (Wed.) - 24 (Fri.)
Design & Manufacturing Solutions Expo
 
June-July
Place: Port Messe Nagoya
Period: June 29 (Wed) - July 1 (Fri)
Automotive Engineering Exposition
 
Oct.
Place: INTEX Osaka
Period: Wednesday, October 5 - Friday, October 7
Design & Manufacturing Solutions Expo
 
We will announce on our website when we decide to participate in other exhibitions.

Notice of Relocation

Hello, RPV.

Effective April 19, we will move to the following location.

275-2 Muro, Otsu-cho, Kikuchi-gun, Kumamoto Prefecture, Japan

The website has already been changed for more information,

Please check our website.

The Kikuyo office, which is currently in operation, will be open until April 30.

Thank you for your continued support.

peach blossom

It's been a while, RPV.

How is everyone doing in the midst of the Corona disaster?

I had nowhere to go, nowhere to go, and no blog posts.

It will soon be time for hanami (cherry blossom viewing), but normally, people use hanami as a reason to go out to eat.

I am going to go out, but I wonder if they will refrain from doing so as they did last year. It's a pity.

I have a peach tree planted in my yard, so I will be quietly watching it as I did last year.

I will enjoy it at home.

The photo was taken on March 14.

The silver lining is that vaccines are slowly becoming available.

Let's hang in there for a while longer!

See you soon!” ‘I wish you the best of luck!

Assembling figures Part 2: Completed

Hello RPV.

It has been rapidly getting colder recently, how are you all doing?


Now, this time, we will continue from the previous issue, completing the assembly of the figure.

Since the last time we were up to modifying and removing parts, we will start with the assembly process.

Where to start...

Hmmm, I think I will assemble the chest first.

Once the position of the first part is determined, the parts are assembled based on it as they are assembled.

As was the case last time, the first time is still the most crucial.

If the first one shifts, the others will shift too.

Here's the problem.

I photographed the parts without removing them from the runner. Articulated parts such as arms and legs had to be rotated and deformed to assemble them.

I don't want to assemble the pieces as they are removed from the runner, so I don't think I can use the ones photographed while they are still on the runner.

Those that can be corrected are corrected, and those that are difficult are transformed and photographed again.

Once photographed, the assembly will resume.

In reality, I think we will be assembling the deformed parts with fine-tuning, but since the parts photographed cannot be moved, there will be some misalignment...

The 90° rotation or angling is not subtle enough or moved too much.

I feel bad, but I have no choice but to close my eyes and proceed.

I tried to make it as symmetrical as possible, redoing it many times, and managed to complete it.

The total number of parts used in the final product is 371.


It took quite a bit of time, but I am happy to see the finished product.

I thought it was done quite well.

On reflection, I should have made the skeleton first.

Since I started attaching and assembling the chest part first, it happened that the arms assembled first bumped into each other when I was assembling the legs.


I started over, thinking that I had made it all the way through.

I thought I learned once, but I didn't spread my arms wide enough, and I made the same mistake with my lumbar...

The waist is wider than expected, isn't it?

I even colored it at the end.

It looks cool without coloring, but it has a different quality.

The colors are slightly different, but I did my best to bring them together.


I personally think that I have improved from the last time as this is the second time.

I would like to try again if I have the chance. See you then.

Figure Assembly Part 2

Hello RPV.

October has come and the weather has become more comfortable.


Now, let's take a look at the second part of figure assembly.

I would like to assemble RG1/144 Sinanju.

First, as before, the out-of-box parts are photographed by CT as they are without removing them from the runner.

Since this is the second time, I thought I would increase the difficulty a bit, but it's quite a lot...

Since there are more parts than last time, we will photograph them all at once.

The parts taken together are removed from the runner.

The basic flow is almost the same as the previous Bentenmaru, but it takes more time to work on each of the many parts.

All in all, there are 385 parts. This is about 3 times as many as last time.

It is quite difficult just to remove the parts while correcting the problem.


It took quite a long time, but what we have done so far is just a preliminary preparation, and we will finally start the assembly work from here.

Having said that, I actually haven't finished assembling it yet...

It was actually supposed to be finished already, but I am struggling with the number of parts.


I will post it on my blog when it is completed, but for now this is what it looks like.

The hips, legs and weapons are not done.


The number of parts used so far is approximately 280.

I don't think I will use all the parts I photographed for the assembly because I can't have all the weapons...

There are still less than 100 left. We will do our best.


See you next time for the completed version.

Fireblade consumable parts replacement

Hello RPV.

The master tank, tires, etc. were replaced this time.
The tank was so cloudy that it was hard to tell how much was left due to age and deterioration.
Replacement was made.
It is not fun to replace them as they are, so we will use the trendy smoked type.
Popular Kawasaki genuine parts were selected.
(I just wanted a Brembo with b mark 😄😄😄)

Clutch: (I/X) reservoir 43078-0586
F brake: reservoir master, FR 43078-0577

The clutch tank is an integrated type, so use the DAYTONA connector set.

The place where the flow path is taken out cannot use snap rings, so an aluminum plate is used.
We cut it out and made a suppression.
The next time I make a modification, I will measure the outlet and make it CAD, so I will try to make it by machining.

We will also replace the chain that has been in use for almost 10 years.
D.I.D 530ZVM-X-120ZB G&G was chosen.

Tires were also replaced.
Dunlop Alpha-14, I flirted with Michelin last time but went back to Alpha again.
I was dissatisfied with the wear resistance, but you can't beat absolute grip.

I went to the Kushitani Running Association at the SPA directly in order to peel off the skin.
Grip is great👍👍👍
Tires are finished in one lap as the maximum temperature exceeds the hottest day of the year.

As expected, temperatures and road surface temperatures are too high 😱 too severe.
I respect those who run summer endurance races such as the 8 endurance races. They are superhuman.

Corona overload and heat stroke are common, so take care of yourself.
SafetyRaid everyone. See you soon ✌✌

BOA system repair for riding shoes

Hello RPV.

This time, the BOA system of the riding shoes I usually wear
A wire broke and was repaired.

I have been using RS TAICH RSS006 DRYMASTER almost everyday for 3 years and this is the first time the wire broke.
I was thinking of sending it to R.S.T.I.C. Customer Support to have it repaired,
https://www.rs-taichi.com/support/

I looked into it and found the BOA Guarantee Program.
Our products are rigorously tested under the harshest conditions.
However, in the unlikely event of malfunction or damage
Take advantage of the BOA Guarantee Program." The claim that "The BOA Guarantee System.
In addition, they will send you a free repair kit.
https://www.boafit.com/ja-jp/support

Check the repair instruction video (English version) to see if you can replace it yourself.
If you are unsure, check with the distributor.
https://www.boafit.com/en-us/support/repair-guides/L4-L5-repair-guide

Order a free repair kit on the BOA website.
When you confirm the order, you will receive an email with the order #.

After a short wait, you will receive a shipping e-mail.

In this case, the order arrived in 5 days.
It came by FedEx mail instead of Chinese mail due to Corona.
The package tracking was also reassuring.

When I checked the package, I found that only one side was damaged, but there are two pieces (for both sides) in the package.
This is another reliable manufacturer in this area.

Now let's break it down.
First, there is a hole in the "o" part of the boa, which can be unscrewed using the supplied tool.
(This screw is tightened so as not to crush the screw.)


Check the wire is broken.

The internal drum is wired differently than it was sent.
(Is it before the specification change?)

In this case, we will repair the original drum wiring.
However, the repair as it is is not interesting, so I will change the color of the wire.
Purchase 0.8 mm (0.5 mm wire) of membrane wire at a home center.
\It was about 300/m.

Wire the drum and return it to the case.

I fixed the dial and thought one side was done,
Forgot to pass one wire loop ٥-¯¯¯.

Finished by threading all the wire loops.
The red wire increases satisfaction after repair.

This time, we use unauthorized wires, so the durability and usability are not as good as they could be.
Long-term verification.

Be careful to take care of yourself during the corona overload, as heat stroke is likely to occur as well.
SafetyRaid everyone, see you soon.